Chapter 14: アクセシビリティ
エラー処理が整ったら,誰にとっても使いやすい UI へ仕上げる番です。ここではフォームバリデーションを例に,サーバーサイド検証と useActionState を組み合わせて,アクセシビリティを考慮したエラーメッセージを表示します。
この章で扱う内容
- Next.js で eslint-plugin-jsx-a11y を使い,アクセシビリティのベストプラクティスを適用する方法
- サーバーサイドのフォームバリデーションの実装方法
useActionStateでフォームエラーを扱い,ユーザーに表示する方法
アクセシビリティとは?
アクセシビリティとは,すべての人が利用できるように Web アプリケーションを設計・実装することです。キーボード操作,セマンティック HTML,画像・色・動画など多岐にわたります。 本コースでは詳細までは扱いませんが,Next.js が提供する機能と一般的な実践方法をいくつか紹介します。 より深く学ぶなら,web.dev の Learn Accessibility をおすすめします。
Next.js の ESLint アクセシビリティプラグイン
Next.js の ESLint 設定には eslint-plugin-jsx-a11y が含まれており,アクセシビリティの問題を早期に検出できます。alt のない画像や,不適切な aria-*/role の使用などを警告します。
試したい場合は,package.json に next lint のスクリプトを追加します。
"scripts": {
  "build": "next build",
  "dev": "next dev",
  "start": "next start",
  "lint": "next lint"
}
ターミナルで実行します。
初回はセットアップに誘導されます。今の状態で実行すると,次のように表示されるはずです。
では,alt のない画像があったらどうなるでしょう?alt を削除して再度 pnpm lint を実行してみます。
<Image
  src={invoice.image_url}
  className="rounded-full"
  width={28}
  height={28}
  alt={`${invoice.name}'s profile picture`} // この行を削除
/>
./app/ui/invoices/table.tsx
45:25  Warning: Image elements must have an alt prop,
either with meaningful text, or an empty string for decorative images. jsx-a11y/alt-text
リンターは必須ではありませんが,開発中にアクセシビリティの問題を早期発見するのに役立ちます。
フォームのアクセシビリティを向上させる
すでに以下の 3 点を実施しています。
- セマンティック HTML:
<input>や<option>など,意味のある要素を使用。支援技術(AT)が入力要素に集中でき,文脈情報を提供できます。 - ラベリング:
<label>とhtmlForで各フィールドに説明テキストを関連付け。AT のサポートが向上し,ラベルクリックで該当フィールドにフォーカスできます。 - フォーカスアウトライン:フォーカス中の視覚的なアウトラインを適切に表示。キーボード・スクリーンリーダー両ユーザーにとって現在位置が分かります(Tab で確認しましょう)。
ただし,これらはバリデーションとエラー表示をカバーしていません。
フォームバリデーション
http://localhost:3000/dashboard/invoices/create で空のフォームを送信してみるとエラーになります。
空の値が Server Action に送られているためです。これを防ぐにはクライアントまたはサーバーで検証します。
クライアントサイド検証
いちばん手軽なのは,ブラウザのネイティブ検証を利用する方法です。required を各要素に追加します。
<input
  id="amount"
  name="amount"
  type="number"
  placeholder="Enter USD amount"
  className="peer block w-full rounded-md border border-gray-200 py-2 pl-10 text-sm outline-2 placeholder:text-gray-500"
  required
/>
空で送信するとブラウザが警告します。 多くの支援技術がブラウザの検証をサポートしているため,この方法でも一定のアクセシビリティは確保できます。
この後はサーバーサイド検証を学ぶため,追加した required はいったん削除しておきます。
サーバーサイド検証
サーバー側でフォームを検証する利点:
- DB に送る前に期待する形式であることを保証
- クライアント検証の回避(悪意ある操作)に対する耐性
- 何が「正しいデータ」かの単一の真実の所在(Single Source of Truth)
create-form.tsx で useActionState を使います。フックなので "use client" が必要です。
useActionState は (action, initialState) を受け取り,[state, formAction] を返します。
createInvoice アクションを渡し,<form action={formAction}> を指定します。
// ...
import { useActionState } from 'react';

export default function Form({ customers }: { customers: CustomerField[] }) {
  const [state, formAction] = useActionState(createInvoice, initialState);

  return <form action={formAction}>...</form>;
}
initialState は自由に定義できます。ここでは message と errors を持つオブジェクトを使い,型は actions.ts から State をインポートします(次に作成)。
// ...
import { createInvoice, State } from '@/app/lib/actions';
import { useActionState } from 'react';

export default function Form({ customers }: { customers: CustomerField[] }) {
  const initialState: State = { message: null, errors: {} };
  const [state, formAction] = useActionState(createInvoice, initialState);

  return <form action={formAction}>...</form>;
}
次にサーバーアクションを更新します。検証には Zod を使います。
const FormSchema = z.object({
  id: z.string(),
  customerId: z.string({
    invalid_type_error: 'Please select a customer.',
  }),
  amount: z.coerce
    .number()
    .gt(0, { message: 'Please enter an amount greater than $0.' }),
  status: z.enum(['pending', 'paid'], {
    invalid_type_error: 'Please select an invoice status.',
  }),
  date: z.string(),
});
customerId:空だと型エラーになりますが,わかりやすいメッセージを追加amount:文字列→数値の coerce を使うと空文字は 0 になりがち。0 より大きいことをgt(0)で強制status:'pending' | 'paid'の列挙。未選択時のメッセージを追加
createInvoice を (prevState, formData) で受け取る形に変更します。
export type State = {
  errors?: {
    customerId?: string[];
    amount?: string[];
    status?: string[];
  };
  message?: string | null;
};

export async function createInvoice(prevState: State, formData: FormData) {
  // ...
}
検証は parse ではなく safeParse を使い,成功/失敗を分岐します。
export async function createInvoice(prevState: State, formData: FormData) {
  const validatedFields = CreateInvoice.safeParse({
    customerId: formData.get('customerId'),
    amount: formData.get('amount'),
    status: formData.get('status'),
  });

  if (!validatedFields.success) {
    return {
      errors: validatedFields.error.flatten().fieldErrors,
      message: 'Missing Fields. Failed to Create Invoice.',
    };
  }

  const { customerId, amount, status } = validatedFields.data;
  const amountInCents = amount * 100;
  const date = new Date().toISOString().split('T')[0];

  try {
    await sql`
      INSERT INTO invoices (customer_id, amount, status, date)
      VALUES (${customerId}, ${amountInCents}, ${status}, ${date})
    `;
  } catch {
    return {
      message: 'Database Error: Failed to Create Invoice.',
    };
  }

  revalidatePath('/dashboard/invoices');
  redirect('/dashboard/invoices');
}
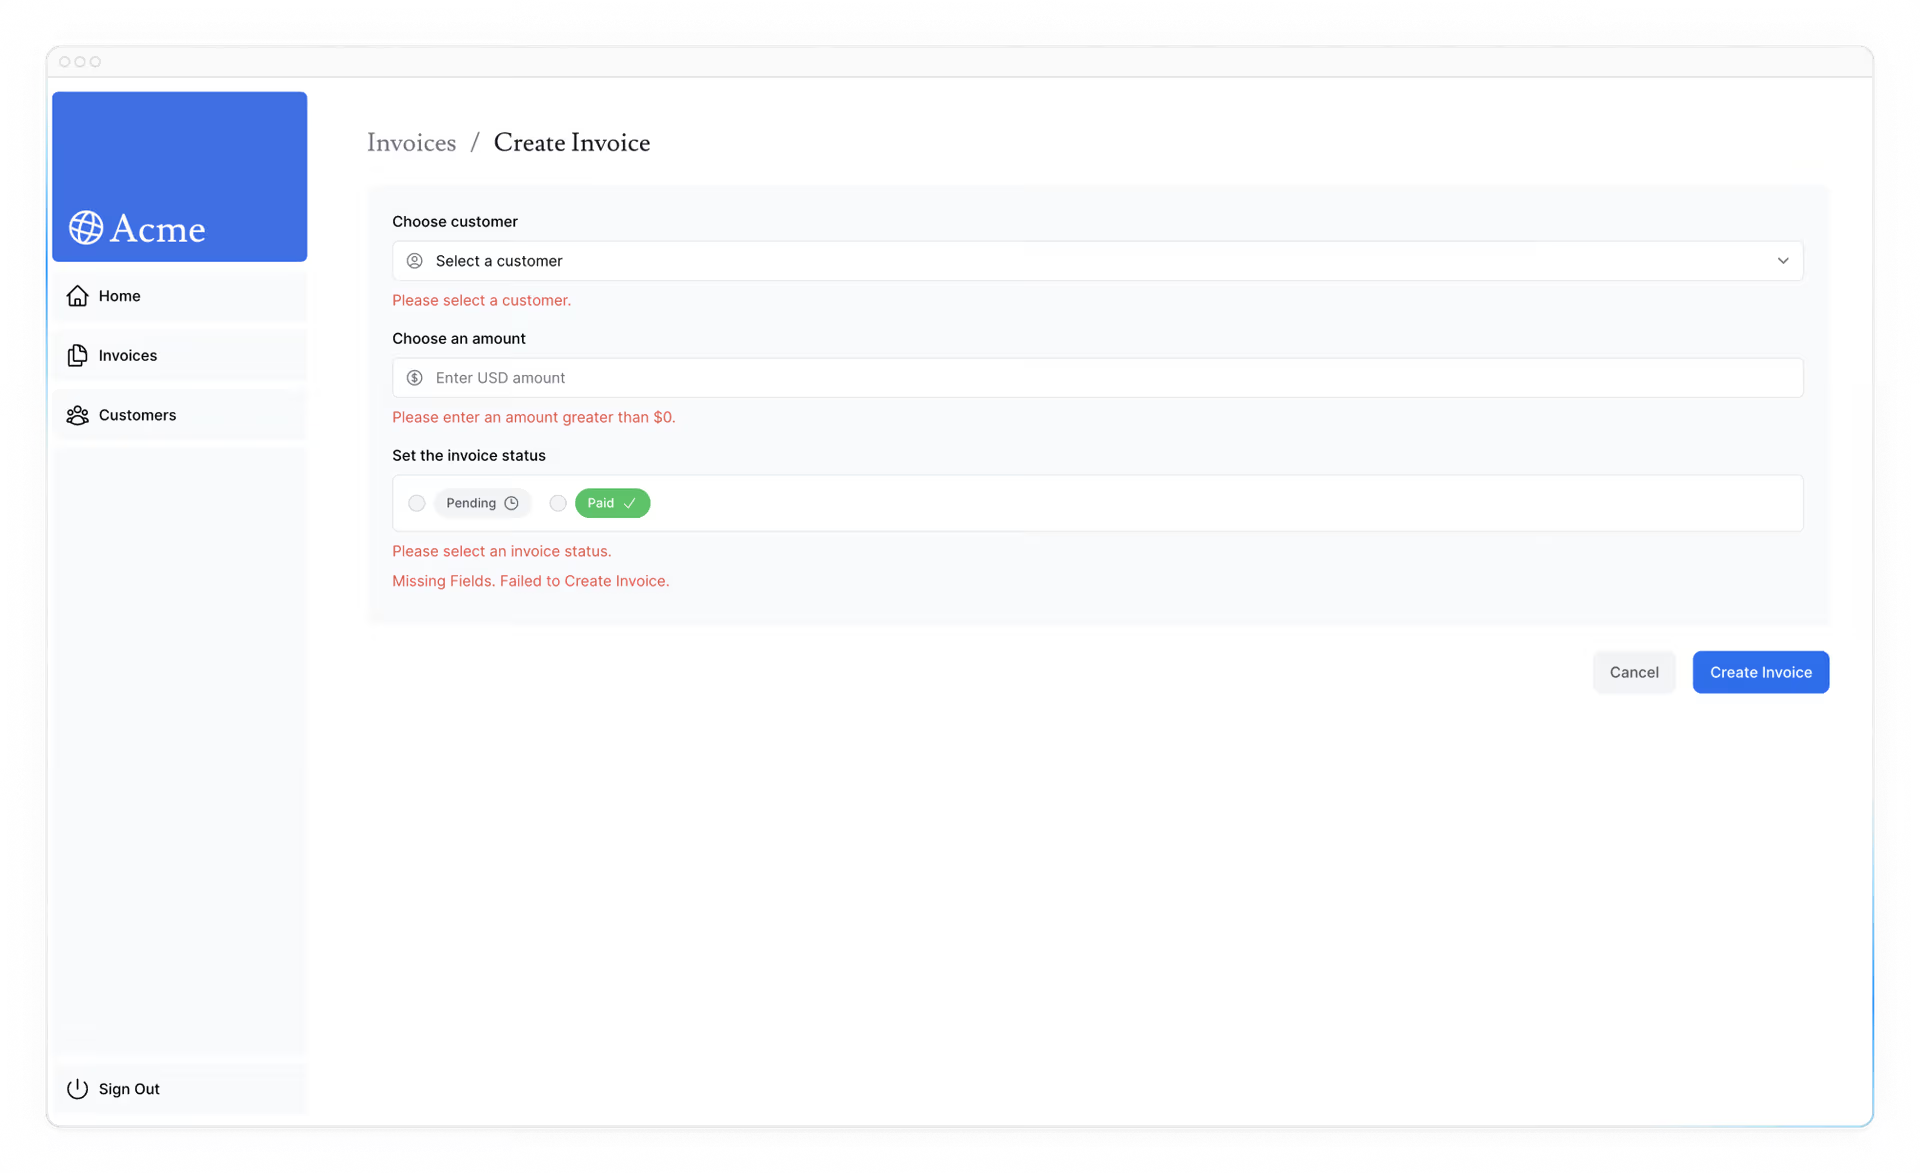
フォームにエラーを表示する
create-form.tsx で,state.errors を参照してフィールドごとにエラーを表示します。
また,ARIA 属性を追加し,支援技術で適切に読み上げられるようにします。
<form action={formAction}>
  <div className="rounded-md bg-gray-50 p-4 md:p-6">
    {/* Customer Name */}
    <div className="mb-4">
      <label htmlFor="customer" className="mb-2 block text-sm font-medium">
        Choose customer
      </label>
      <div className="relative">
        <select
          id="customer"
          name="customerId"
          className="peer block w-full rounded-md border border-gray-200 py-2 pl-10 text-sm outline-2 placeholder:text-gray-500"
          defaultValue=""
          aria-describedby="customer-error"
        >
          <option value="" disabled>
            Select a customer
          </option>
          {customers.map((name) => (
            <option key={name.id} value={name.id}>
              {name.name}
            </option>
          ))}
        </select>
        <UserCircleIcon className="pointer-events-none absolute left-3 top-1/2 h-[18px] w-[18px] -translate-y-1/2 text-gray-500" />
      </div>
      <div id="customer-error" aria-live="polite" aria-atomic="true">
        {state.errors?.customerId &&
          state.errors.customerId.map((error: string) => (
            <p className="mt-2 text-sm text-red-500" key={error}>
              {error}
            </p>
          ))}
      </div>
    </div>
    {/* ... 他フィールドも同様に */}
  </div>
</form>
aria-describedby="customer-error":selectとエラー要素の関連付けid="customer-error":エラー要素の一意な識別子aria-live="polite":エラー文言の更新を割り込み無しで読み上げ
ヒント:
console.log(state)で,エラーが正しく届いているか DevTools で確認しましょう(このフォームはクライアントコンポーネントです)。
Practice:ARIA ラベルの追加
上記の例にならい,残りのフォームフィールドにもエラー表示と ARIA 属性を追加してください。 また,いずれかのフィールドが欠けている場合は,フォーム下部に共通のエラーメッセージを表示しましょう。
仕上がったら pnpm lint を実行して ARIA の使い方に問題がないかを確認してください。
さらに挑戦したい場合は,この章で学んだ内容を edit-form.tsx にも適用してください。
useActionStateをedit-form.tsxに追加updateInvoiceアクションを Zod の検証エラーに対応- コンポーネント側でエラーを表示し,ARIA ラベルも付与
// ...
import { updateInvoice, State } from '@/app/lib/actions';
import { useActionState } from 'react';

export default function EditInvoiceForm({
  invoice,
  customers,
}: {
  invoice: InvoiceForm;
  customers: CustomerField[];
}) {
  const initialState: State = { message: null, errors: {} };
  const updateInvoiceWithId = updateInvoice.bind(null, invoice.id);
  const [state, formAction] = useActionState(updateInvoiceWithId, initialState);

  return <form action={formAction}>{/* ... */}</form>;
}
export async function updateInvoice(
  id: string,
  prevState: State,
  formData: FormData,
) {
  const validatedFields = UpdateInvoice.safeParse({
    customerId: formData.get('customerId'),
    amount: formData.get('amount'),
    status: formData.get('status'),
  });

  if (!validatedFields.success) {
    return {
      errors: validatedFields.error.flatten().fieldErrors,
      message: 'Missing Fields. Failed to Update Invoice.',
    };
  }

  const { customerId, amount, status } = validatedFields.data;
  const amountInCents = amount * 100;

  try {
    await sql`
      UPDATE invoices
      SET customer_id = ${customerId}, amount = ${amountInCents}, status = ${status}
      WHERE id = ${id}
    `;
  } catch (error) {
    return { message: 'Database Error: Failed to Update Invoice.' };
  }

  revalidatePath('/dashboard/invoices');
  redirect('/dashboard/invoices');
}
これで,アクセシビリティに配慮したサーバーサイド検証と,useActionState を用いたエラー表示が実装できました。次章へ進みましょう。